Having a solid understanding of the pattern interface is essential for creating music in FL Studio because it is the place you will begin no matter what you are trying to do, or sound you wish to create.
Every single sound you may wish to use in the program is accessible through the pattern interface, whether a sampled audio sound, or a custom beat, its all located here.
Depending on what version of the software you are using, there might be slight alterations and differences to how things appear, but the fundamental concepts remain the same and the information outlined here should give you a good understanding of how to start working with the pattern interface to start creating beats and melodies.
If you create a new project one of the first things you will see is the pattern interface, keep in mind that you can open or close this at any time you like, simply by clicking on the tool bar icon for it, or by using the hot key F6 on your keyboard.
While it may be a bit overwhelming to commit the hot keys to memory when you first start using the software, in time you will become more familiar with them, particularly for the functions you regularly interact with and this will speed up your production time dramatically giving you much more momentum in your creative flow.
As indicated, dependant upon which version of FL Studio you are using, you may find your screen looks a little different, depending on the default layout and arrangement of the GUI when first installing, however fundamentally your pattern interface should look something like the following image when empty…
![]()
Inserting Audio
One of the first things to understand about the pattern interface is that you can create as many patterns as you desire, and the best way to go about viewing them is simply as different sections or movements of your composition, so for example you may have one pattern that focuses on the intro beats, before adding in another layer that focuses on the chorus and then yet another section for your melody or sampled sounds sections, always keeping in mind that you can later fine tune the placement of these beat channels in the playlist interface once you have all your audio sections created.
There are a variety of different ways for you to create a new sequencing channel, but the most simple methods are to either use the navigation menu located at the top to select a create a new channel by clicking on the channels button and then selecting add one, or alternatively you could click and drag an existing sample using the software's browser, the choice is up to you, when starting out use the method your most comfortable with.
Dependant upon what task you are trying to perform may dictate what method you might prefer in any given situation, for example, if you are adding custom audio files you might find the drag and drop approach more appropriate, however for adding in custom VST and instrument files, you might find the navigation menu more appropriate, however, it is up to you, both roads lead to Rome.
To start with, take a look through the audio menu and select a few drum sounds and place them into the pattern interface using the drag and drop method, placing each sound should generally create a new channel, however be advised that if you move your selected beat and place it over a channel that has already been created it will overwrite the existing beat in that position, while this can be useful if you are trying out alternate sounds, be careful of this when working with larger compositions because it can slow you down considerably having to locate those original drum samples again through the menu.
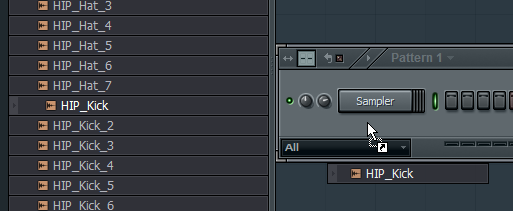
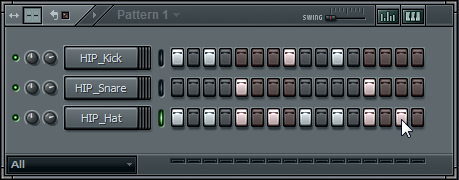
Once you have navigated through the menu and added some audio beats and samples to your pattern it should look something like the following image…
Understanding the Channel Section
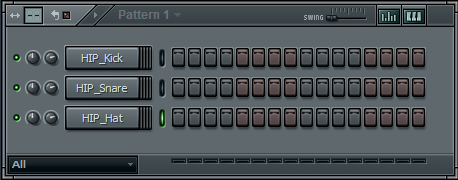
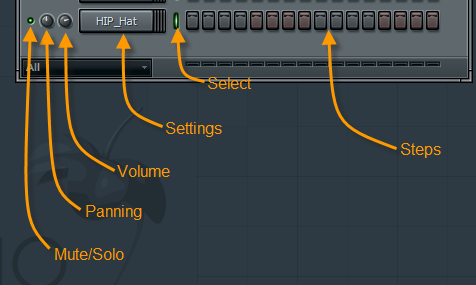
One thing you should notice once adding your beat audio is that there is an individual row for each channel you have created, on the left hand side of the pattern interface rows you should see a button that will allow you to switch between the solo/mute capabilities.
Following along you should then see a dial button that allows you to control panning of the audio, and next to that a rather large button that is a sort of oval in shape that allows you to select the channels themselves, if you notice it is displaying a light, that means that particular channel is active.
You can of course select multiple channels at a time by using the right mouse click function as well, and at last one of the most notable features is you should see the row of different buttons, these are know as the steps, and this is where you will place your beats.
Understanding the Step Sequencer Section
One of the most effective way of placing your different beats, audio samples and custom sounds is by using the step sequencer.
The first thing you will probably notice is that each row of sound has its own series of buttons associated with it, each one of these particular buttons are known as a step, and they are expressed as 1/16 of a bar of music, if your not familiar with music theory that is perfectly fine, the fundamental to understand is that each of these steps will be what comprises each section of your music.
Fundamentally each particular four steps that you see, equates to one full beat of music, so if you wanted to create a rhythmic pulse that was in standard time, you would place one beat, on every fourth button that you see, one thing that helps with this is that each particular section is actually colour coded which can be really useful when you are first familiarizing yourself with everything and greatly speed up your production time.
Each time you click on an individual button within the row of any given audio sound you will hear the phrase or beat played back to you for whatever is selected for that channel, conversely, if you want to remove the placement of the beat or sound all you have to do is click on it again to remove it, using this method you can very easily create a simple beat pattern.
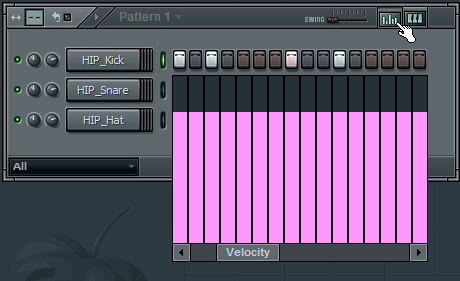
Different elements of specific steps can also have variable controls adjusted, such as its audio level or speed by selecting the visual display editing button which is positioned near the swinging slider in the top right hand section of the pattern window itself, by clicking on this it will instantly allow you to see all the different options of your current active channel and you can use the sidebar to move through all the different options that are available for you to tweak and edit, when your done simply press the visual display button to return to the original view.
If at any time you would like to hear what your beats sound like at any given time, all you need to do is set the play mode to the PAT function (this is the little light that you can see next to the play icon) and click on it once to begin hearing the playback of the section.
![]() One other thing to take into consideration is that if you take a look to the right hand side of that button you will see what is known as a tempo speed value, this is something you can adjust for each pattern and section you are working in if you want to see how the audio would sound at a different speed.
One other thing to take into consideration is that if you take a look to the right hand side of that button you will see what is known as a tempo speed value, this is something you can adjust for each pattern and section you are working in if you want to see how the audio would sound at a different speed.
Another way that you can start and stop your audio playback is actually by using the space bar on your keyboard however do note that in some sections of the software, particularly when using custom VST's that particular key may actually be assigned to other functions, however this is something you will become familiar with over time, and in those situations, just opt for the manual playback option.
One of the great things about the playback options is its flexibility, you are able to keep the audio playing on a repeating loop while you continue to work on your individual step sequences, which can prove quite useful when your trying to hear the creative aspect of your beat pattern in its full context.
If you want to change to a new pattern all you have to do is click in the area that says pattern in the playback icon section and you will notice that next to the tempo, where it says PAT, all you need to do is using your mouse, drag up or down or alternatively use the minus and plus signs on your keyboard to change the value, and thus, change the selected pattern.
Understanding the Piano Roll Section
While you can in theory use the piano roll section for creating beat patterns, traditionally it is most suited for more melodic pattern styles, sections involving lead sections, keyboard sections or combinations and arrangements of both.
Inserting a standard piano sound is very simple, all you need to do is using the navigation menu located at the top of the software select the channel menu, then add one, and select FL Keys, doing so will create a brand new channel in your sequence simply called “keys”
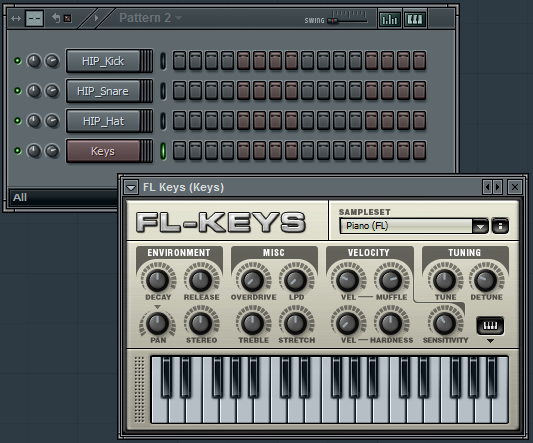
In the sequencer section, navigate to and click on the button in the keys section to bring up the graphic user interface for the piano roll section.

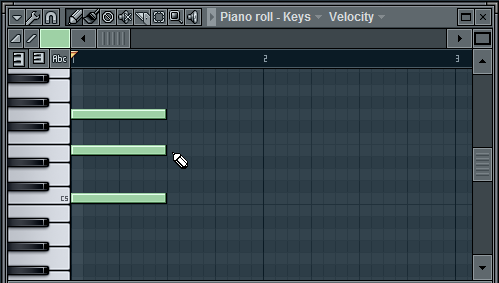
Immediately once you have clicked the button a new area window will appear that you can start working in…
![]()
The section that has appeared is simply known as the piano roll window and you can draw in the upper area simply by clicking with your mouse on the position where you would like different notes to be placed, you can adjust the duration of the note by adjusting the length of the drawing, adding a combination of notes will even allow you to produce fully featured chords.
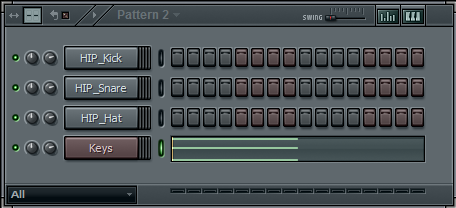
Once you have finished placing your note values and durations down and you finally close the panel you will see that the channel section no longer displays the steps and have been replaced by a visual display that expresses what is contained within the channel for that particular piano roll section.
Always remember that the software is highly dynamic and versatile, so if at any point you would like to edit the melody in the piano roll you can easily open it again by clicking on the piano roll button in the toolbar or by using the hot key F7.