The emphasis of this tutorial will be to explain and elaborate upon the playlist interface, how its functionality works and how you will be using it to organize and group together all the various beat patterns and audio sections you have created.
The playlist is used in the final steps of producing your track to arrange and organize all the various sections together, fine tweaking and overlapping points and making sure everything comes together into a seamless piece of music, viewing the playlist interface itself can also be an excellent way for you to visually see how your patterns are progressing even as you are creating them as it gives you a birds eye view of the entire track.
In this section, the visual representation in the diagrams may differ slightly from what you have on your screen depending on what version of the software you have installed and further more what beats you currently have created in your track, however use them as a fundamental guide for your activities and as a reference for understanding the playlist interface section itself.
You can access the playlist interface by using the hot key F5 or my selecting its associated icon from the navigation menu located at the top of the program, simply use the hot key or click on the icon once to switch the visibility options of the playlist.
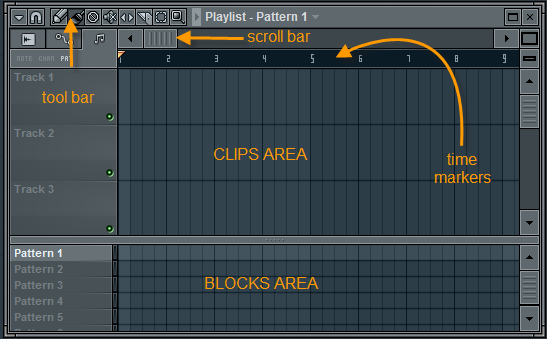
When you first review the playlist a few particular areas of interest will be immediately visible, most notably the scroll bars and marker sections indicating the timeline of the total track and the interactive toolbar located across the top of the playlist itself.
Beneath these areas you will see an area where things are split, the bottom section generally indicates the pattern sequence section, while the top indicates the clip section, giving a visual display in a group like function of any sampled sounds and beats that are used in the track, the pattern sequence section itself is easily identifiable by reviewing the left hand side of the screen where a list of patterns should be visible with small grid section squares.
While the tool bar sections can be elaborated on in great depth, the primary focus for now should be understanding how to use the playlist as an arrangement tool for adding the finishing organizational touches to your track.
Using the Pattern Block Section
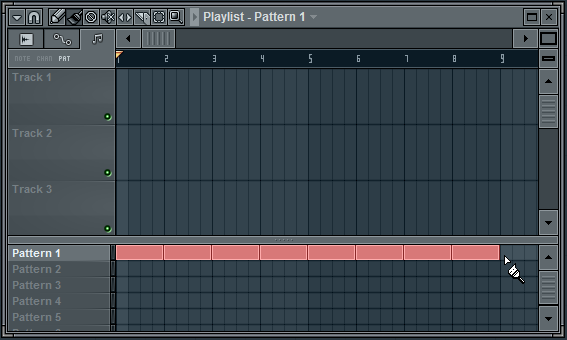
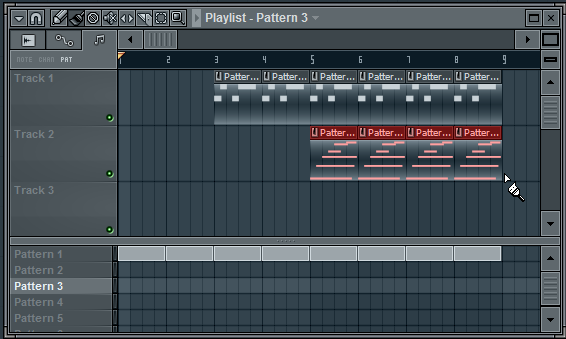
Using the playlist window, the best place to start is by arranging your different patterns into a particular sequence, simply access the playlist section and navigate all ll the way to the left hand side, from there you will see that the pattern block area is visible.
On the left hand side, click where you see a label indicating the first pattern, this will make the pattern active and you will then be able to click to the right hand side of where you see it in the grid and draw individual blocks into the first pattern grid section.
And just like that, and with minimum difficulty, you have successfully completed implementing the first beat layer in the arrangement process, repeat this process for a total number of eight times working towards the right hand side of the playlist interface.
![]() Keep in mind while you are working on your arrangement in the playlist interface that at any time you would like to hear what you have done so far you can easily do so by making sure you have selected “song” as your audio playback option and clicking on the play icon, this will take you through the entire playlist pattern you have just designed, when you are finished reviewing the audio, click the same icon again to stop the playback.
Keep in mind while you are working on your arrangement in the playlist interface that at any time you would like to hear what you have done so far you can easily do so by making sure you have selected “song” as your audio playback option and clicking on the play icon, this will take you through the entire playlist pattern you have just designed, when you are finished reviewing the audio, click the same icon again to stop the playback.
Arranging Pattern Clips
Using pattern clips happens in much the same way as working with the pattern blocks, in this instance simply select the second pattern in the pattern block area and this will instantly start the second pattern.
From here you simply navigate to the clip are and on the left hand side click on the pattern clip that should be visible, you then use your mouse to place the clip itself, focusing on making sure that it starts on the third bar, or on the section where it is required, in this instance place it on the third and repeat the process twice additionally.
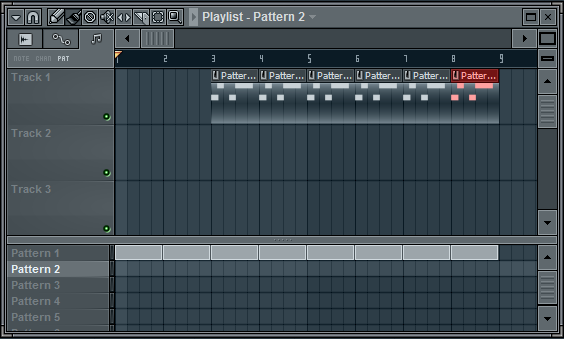
Using the audio playback options, making sure that your mode is set to song and then initiating the playback you should hear the first pattern by itself for the first part of the composition, followed by the second pattern and the first in unison for the remainder of the arrangement you have designed thus far, this is known as audio layering and is a fundamental part of the production and compositional process.
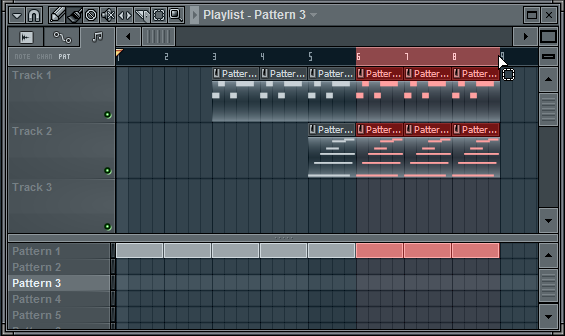
If you are feeling adventurous, in the pattern block area select pattern three to make it active and then draw in the clip area for the last four bars of the currently arranged eight bar sequence to produce some interesting and dynamic results.
Using Volume Automation for Dynamics
Using different layers of volume is not only useful for ensuring your track is finalized at the most appropriate level, but it is also a tool or effect within itself for creating and expressing different levels of dynamics as appropriate throughout your composition, for instance say that you wanted your track to have a slow fade our during the end…
Simply highlight the section that you wish to apply volume automation and with the CTRL key held down, click and move from the beginning of the sixth bar in the sequence, to the last within the confines of the indicated time area, this will change the colour of the bars themselves which will indicate that volume automation has been applied to these particular sections.
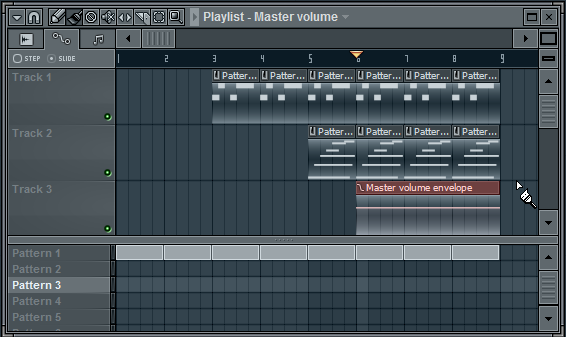
From here, access the primary volume section from the tool bar and finalize the automation by selecting the option “create automation clip” after right clicking on the appropriate highlighted sections.

Once you have done this, the volume automation will have been imputed into desired location and will be displayed visually with a line through the middle of it, this line is an indication of the volume level for that section that the automation applies to, remember at any time you can return to the playlist section by using the hot key, or pressing the associated button and from there deselect the current area by clicking while holding the CTRL key anywhere in the time marker section of the display panel.
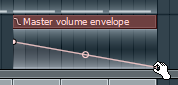 Once you have returned to the primary view of the playlist interface by clicking on the time marker section you can adjust the fade out levels of the ending of the current arrangement by selecting the right side handle in the volume envelope and lowering it to the bottom, at any time you wish to hear a playback of your actions to see if the fade level is appropriate remember you can press play to hear the total arrangement all the way through, including any affects of fades you may have applied or currently be tweaking.