One of the most empowering features of FL Studio is being able to diversify the range of sounds you are using, this can be done through your own sampled sounds, but it can also be done using existing VST's of which there are a multitude of types, the first being instrument based and the second effects based.
As you might expect from there names, the two different types do different things, but one of the excellent things about VST files is that while there are many paid premium ones available, there are also a wide variety of free ones as well, making it possible for you to continue to expand your sound bank at minimum cost and with minimum complexity, the purpose of this tutorial will be to show you just how simple it is to get started finding and importing these custom VST files, so lets get started.
Initial Requirements
While it is presumed if you work in the digital music space you would have a good handle on navigating the internet and downloading files, its alright if you have some gaps in your knowledge, so before you begin make sure you are familiar with the following processes…
-
Using the windows navigation browser to create folders and locate existing ones.
-
Familiar with downloading software from the internet (and how to avoid virus's)
-
How to work with .RAR & .ZIP files, in terms of extracting them.
Downloading VST Files
To even begin the process of importing a VST you first need to obtain it, this is of course done by downloading the file to your computer, while you may feel free to use any VST you like in conjunction with this tutorial, for the sake of reference, there are two suggested files for the purpose of you following along with the process in this tutorial.
The first is a limiter VST, an effect type that can be used to increase the over all volume of your final piece of music, its called W1 Limiter – Created by George Yohng, if you would like to find out more information about this VST, you may do so (Learn More)
The second is a now older VST, but still useful, known as Sonik Synth 2 Free, this version is considered a “light install” of the original file but still boasts diverse functionality, it has since been replaced by more current versions created by IK Multimedia, and if you would like to view more information on this VST range, you may do so (Learn More)
Both of the suggested VST files to use while following along with this tutorial are in the .ZIP file format, this is a type of file that has been compressed, to be thought of like a box, packaging and reducing the size of the file contained inside making it easier to manage and faster to download.
Preparing FL Studio
All software, including FL Studio, requires files and resources to be placed in a specific hierarchy of folder architecture in order for it to be used and accessed, so to begin installing any VST's you may wish to use, you first must place them in the correct folder for the software to be able to recognise there existence and import them correctly.
While there may be subtle variations of VST folder location dependant upon which version of the software you are using, generally speaking, the traditional place you will want to put your files is in the following folder: C:\Program Files\Steinberg\VstPlugins or as indicated, somewhere similarly named depending on your version.
You are of course not locked in to using this specific location, however it is advisable for the sake of streamlining things, particularly when you are first starting out with the software, other options you may wish to consider as you become more proficient with your skills are placing them in custom folders, either on your existing or secondary hard drive, or even keeping them on a backup external hard drive, which will make things much easier when upgrading in the future, but as suggested if your just starting out, stick with the basic option to reduce confusion and familiarize yourself with the concept.
Navigate to the folder C:\Program Files\Steinberg\VstPlugins folder either by manually moving through your hard drive from the starting place on your “My Computer” or “This PC” section, or by using the windows explorer panel address bar, if the folder does not already exist within that folder, you can create it.
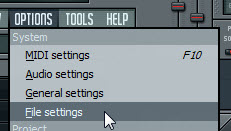
After downloading, extracting (generally right clicking and selecting extract) and placing the files in the recommended location, it is now time to start FL Studio and start the process of importing the files into the software, once you have loaded the software, in the navigation menu select Options and then file settings to begin the procedure.
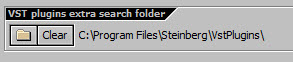
In the settings screen you will see that in the bottom section there is a label “VST Plugin extra search folder” this is important to pay attention to because if it has not already been set by default to the folder we have placed our files into, you will need to change it manually by selecting the browse button, navigating to that folder and selecting it and then confirming your folder selection, by doing so moving forward, whenever you wish FL Studio to check for a new VST you may have added, it will check this folder.
Installation Variations
As you are familiar VST files are custom file types that have there own particular unique extensions, the reason two different VST files were suggested for this tutorial, is because there are different ways that these files can often be installed, while you are now familiar with placing the single files within the folder option, the other option available is that some VST files come packaged within there own custom installation program, that will ask you where on your computer you would like the file to be installed.
Using an Installation Program
If you have obtained your own VST with an installer to follow along with that's fine, but if not, go ahead and open the .ZIP file for the second suggested VST Sonik Synth 2, and once extracted double right click on the .exe file or left click and select run, dependant on your preference, this will start the custom installation program for this particular VST, its a screen style you may be already familiar with from installing other applications on your computer and the process is essentially the same, indicating that you would like to install the VST file only, it will then prompt you to tell it where you wish to install the file…
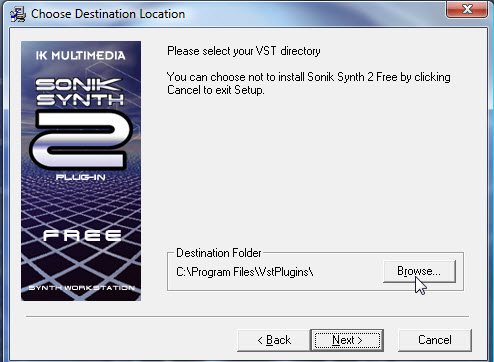
In the image shown above, you will notice that the path directory for the installation is set to the standard VST folder we are using for the purpose of this tutorial, however in the event that you were using a installation program that did not have it listed, you would simply select the browse option and navigate to the desired folder, just like you would with any other installation program to select the appropriate location, then simply follow the prompts by clicking next and in a matter of moments you will have successfully installed the custom file.
Manual VST Installation
While using custom installation programs are always more straight forward and simple to use when adding custom files, the majority of VST files you encounter will require a manual installation as they either come from small boutique producers or developers, however this is not something to be concerned about as the process is quite simple as will be shown…
First extract the .ZIP file for the W1 Limiter VST you downloaded earlier, and then place the file with a extension ending of DLL into the default folder we have been using for this tutorial.
As you become more familiar with using FL Studio and working with custom VST files, you may wish to consider starting to add different layers of folder architecture to your sound bank folders, for instance, you might create another folder, inside of your existing VST folder for different effect styles, or name them by producer or developer, while this is something to keep in mind for the future, as always when first starting out become familiar with the basic process before exploring advanced ones.
Scanning for VST Files
Extracting and placing the custom file into your desired location is one thing, now you need to ensure that FL Studio knows the file exists and to do that you use its in built custom scanning function designed to detect files of this type.
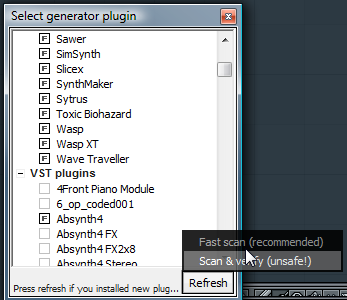
Starting the scanning process is a fairly straight forward process, in the navigation menu at the top of the program simply select channels, add one, more and you will then be presented with a section detailing the existing custom files and similar already installed, moving through this menu section you will notice that those you have placed inside your folder are not yet visible, to have them be detected and incorporated into the list all you need to do is select the refresh button and click on the option “fast scan” and the software will review its folders and import any new files it detects.
The scanning process is fairy quick, at most it should only take a few minutes, and once completed the files you have installed will be visible within the plug ins list, colour coded in red for you to identify easily and you may now use them at your leisure, the scanning process only needs to be conducted once after you have either manually or through an installer added a new custom file, after that the software will always detect the file, unless you move it, in which case, simply re-run the scan.